 |
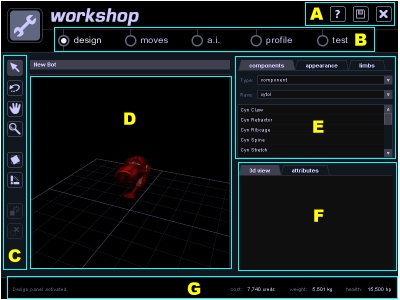
"A" provides the Command Icons.
"B" provides Program Panel Navigation Buttons "D" is our Main Display window. "E" provides various Design Folders. |
![]() Selecting the ? mark will provide a very small tutorial on this page. It will describe some of the basic functions that you can perform. Many people find the Help Screen a little sparse on information, however some strong basic instruction can be found here.
Selecting the ? mark will provide a very small tutorial on this page. It will describe some of the basic functions that you can perform. Many people find the Help Screen a little sparse on information, however some strong basic instruction can be found here.
![]() The diskette icon will open up the Save window allowing you to save your bot. Roboforge can run a little fickle on different machines and crashes can be common, especially after long sessions of bot building. Save your bot often.
The diskette icon will open up the Save window allowing you to save your bot. Roboforge can run a little fickle on different machines and crashes can be common, especially after long sessions of bot building. Save your bot often.
| AutoSave Tip! In your Option Menu (available when you first start your Roboforge Session) you can select an Autosave Option. This will save your bot into a bot file called "Autosave" every time you go to a different Panel. If the program crashes on you then you will still have your most recent bot, since changing panels, saved. |
![]() The X icon will Exit you to the Main Roboforge Menu with the option of saving the current bot.
The X icon will Exit you to the Main Roboforge Menu with the option of saving the current bot.
B - Navigation Bar As titled, each Navigation Icon will take you to the various sections of the Roboforge Program : Designs (Workshop), Moves, AI, Profile, and Test.
C - Workshop Toolbar
![]() The Selector Icon allows you to select the Components and Connection points on those Components in the Main Display window and in the Component Display Window. When you left click on Component Connection points in the Display Window you will see the "Connect Component" Icon become active IF you have a component selected in the Component Display Window.
The Selector Icon allows you to select the Components and Connection points on those Components in the Main Display window and in the Component Display Window. When you left click on Component Connection points in the Display Window you will see the "Connect Component" Icon become active IF you have a component selected in the Component Display Window.
| Selection Drag Tip! You can also hold the left mouse button while selecting a Component and drag that Component (and all components attached to it) into the Limb Bin OR onto Connection Points that become highlighted as you move the pointer over your bot. When you release your mouse button then the dragged component (and all the components attached to it) will attach to the Connector Point that the pointer is highlighting or go into the Limb Bin if you dropped it there. You can also select/drag components from the Component Display Window directly onto your bot. |
| Window Rotate Tip! By clicking and holding your right mouse button you can move your mouse to rotate the view without actually selecting the Rotate Icon. This works in the Component Display Window as well. |
| Grab and Move Tip! If you hold the Control key on your keyboard AND the right mouse button at the same time you can grab and drag the Main View without actually selecting the Grab and Drag Icon. |
| Zoom Tip! If you hold the Shift Key on your Keyboard while also pressing and holding the Right Mouse Button you can quickly Zoom In and Out without actually selecting the Magnify Icon. This works in the Component Display Window as well |
| Component Rotate Tip! If you Right Click on a selected Component a small window will appear asking if you would like to Rotate the component 45 degrees either clockwise or counter-clockwise without actually having the Rotate Component Icon Selected. |
| Joint Rotate Tip! Sometimes it can be very difficult to get your joints back into their original positions once you've moved them. If you wish to test out the movement range of a particular joint to ensure it moves they way you plan then go to the Moves Panel by way of the Navigation Menu. Joint Movement is auto-selected there for easy Joint movement and you can quickly get back to the Design (Workshop) panel by way of the Navigation Menu again. When you return to the Design Panel you will find all your Joints still in the position you left them in. |
| Add Component Tip! If you Right Click on any Component's Connection Point you will get a small window asking if you wish to Add a component. If you Click on Add then whatever component is in the Component Display Window will be added to that Connection Point |
| Delete Component Tip! If you Right Click on any Component a small Menu window will appear with one of its options being to Delete a Component. |
The Main Display Window is how you see to get the work done and is where your bot is displayed, in 3-D, to be worked on. Whatever angles you have the joints adjusted to will be used as your default settings for both the Move Creation Panel and the Beginning of your matches. In other words, if you have a couple of arms and they are all turned down then that is the position they will start out at the beginning of a fight and when you are making Moves.
The "floor" of the Display panel is made up of a 10 meter by 10 meter grid, with sub grids 1 meter each, to give you reference in size. This is also where you can see what your bot is going to look like once you paint it (See Design Folders.
When Components are Selected they will be surrounded by a broken white Box and any available Connector Points will be displayed, unless you have Rotate Component Selected. If Rotate Component is Selected then you will still have the Selector Box, but to see the available Connector Points you will need to press and hold the Right Mouse Button AWAY from your bot and in open space.
There are 3 Design Folders available to choose from - Components, Appearance, and Limbs.
COMPONENTS
When the Component Folder is selected you will find two Pull-Down-Menus, Type and Race. These two Menus define the list of Components that will be listed in the folder. The "Type" Pull-Down-Menu allows you to select the Component type you wish to choose from : Components, Controllers, Energy, Joint, Rotator, Sensors, Shields, and Weapons.
The "Race" Pull-Down-Menu allows you to select which Alien Technology you wish to look at. Once both have been set then a list of Components falling under the matched Type and Race are displayed. When you Select a Component in the List it becomes viewable in the Component Display Window
| Component Folder Tip! If a Component you want to search for is already existent upon your bot you can Right Click that component and Select "Open in Library" and it will load into your Component Display Window. |
APPEARANCE
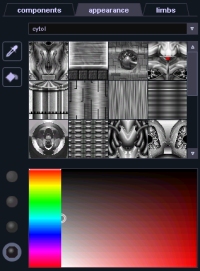 |
The Appearance Folder allows you to Paint and Texture your bot with the a wide range of textural bitmaps for each race. By using a pulldown Menu you can select different Racial Textures and then Scroll thru the displayed images to Click and Select one of your liking. A color chart below this allows you to select the shade that you desire for the texture and to the Left of the color selection are 4 balls that represent different levels of reflection - The lowermost one giving the dullest look while the uppermost gives a shiny appearance. To the Left of the texture Selection Window you will see two icons - Sample and Paint. To use the Sample Icon Left Click on it with your mouse and then Left Click on a component in your Main Display Window. This will load the color and texture of that components appearance. The other icon, Paint, allows you to transform the texture of any component in your Main Display Window to what you have selected in the Appearance Window. |
| Appearance Folder Tip 1! You can create your own Custom Textures to add to your bot. Simply find the C:\Roboforge\Map\ directory (Or whatever Directory you installed Roboforge under) and you will see various sub-directories under \Map. You can then add new .gif files into the listed Racial Directories or Create a Directory of your own. Just be aware that no one else will be able to see your stunning new Textures unless they also have those same Directories and .gif files that you have. |
| Appearance Folder Tip 2! You can create non Textured Components by simply selecting a color and Painting that onto your Bot. This ONLY WORKS if you do this BEFORE you select any other textures. Your components can then have a solid Color that is uninterrupted by Textures. |
LIMBS
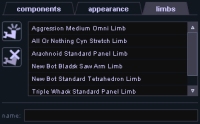 |
The Limb Bin is a very powerful feature which allows a builder to store sections of their bot for later use. You can even use stored limbs from one bot on another. When you select a Limb from the List it will appear in the Component Display Window where you can then Zoom in upon it and Rotate it.
|
When a Limb is highlighted in the Limb Library and it appears in the Component Display Window you can then Left Mouse Click on the Name Field located below your Limb Library Listings and Edit the Name of the Selected Limb.
| Limb Bin Tip! You can select a component in the Main Display Window with your Left Mouse Button and Then Click and Hold your Right Mouse Button to drag that Component and all attached Components directly into the Limb Library (When the Limb Library Folder is open). |
The Component Display Window Displays a several different types of information dependant on what is active. When you've selected a Component, either directly on your bot or from the list of Components, it appears here. You can Zoom in and out and Rotate the component just as you do in the Main Display Window by using the Icons in your Toolbar or by using the keyboard in conjunction with your Mouse. See the Tips associated with the Zoom and Component Rotate Icon.
When a component is displayed then a folder option of "attributes" can be selected which will replace the 3-D image of the component with a list of attributes detailing the characteristics of the Component. Different component types will list different component attributes.
The Component Display Window also displays the currently selected Limb in the Limb Bin Library. Again, the same Zoom and Rotate functions that apply to your bot in the Main Display Window also apply to a limb in the Component Display Window.
When a Component or Limb is displayed in this window it associated Connection Points are also displayed. To connect the Component or Limb to your robot you simply Left Mouse Click on the Connection Point that you wish to use to connect to your bot and also select the Connection Point on your bot in the Main Display Window. Then Click on the "Add Component" Button (described in Toolbars) and the Component/Limb will be joined to your robot by the two selected Connection Points.
| Component Display Tip! By Right Clicking and Holding your mouse button upon a Connection Point of a Component or Limb displayed in the Component Display Window you can quickly drag and drop that Component/Limb onto a highlighted Connection Point on your robot. The Mouse Icon will change into a grasped hand while the Component/Limb is being held, and change into a Pointing Finger when it passes over a Connection Point on your bot. |
The Bot Information Window simply displays the your Bot's Total Cost, Total Weight, and Total Health. If your bot's weight surpasses the maximum weight of the bot's chassis then it will be displayed in Red. Having too much weight on your chassis will increase power usage as you move your bot and also slow down your bot's movement speed.