 |
The Orient control box allows us to set 4 different aspects of the Orient command : How it works when the enemy is detected, How it works when the Enemy is NOT detected, what it needs to do, and how long it tries to do it. The drawback of the Orient Node is its single minded drive to accomplish its orders regardless of its environment. For one, orients make no attempt at avoiding walls. Nothing is quite as disappointing as seeing your bot winning a fight, only to walk into a wall and lose because of being cornered or lose because it just crushed its own controller against them. One other shortcoming of Orients is its failure to maintain a safe distance from the enemy while attempting to move to a location dictated by the Orient Node. Bots following an Orient command tend to take the shortest path to their destination and ignore the distance they are from the enemy. Picture a bot that is ordered to Orient 5 meters away from an enemy and 45 degrees to the right of them. A bot will take a direct path to attempt to get to that location, even if that path brings them closer than 5 meters to the enemy. |
And finally (at least the last thing I can recall off hand) Orient commands DO NOT attempt to use Left or Right movement. If the enemy has moved and your bot is trying to orient on a specific location around them then your bot must first stop, point toward the spot it wants to get to, and then begin moving again. This can, at worse, easily leave you open to an enemy bot with smarter movement commands, and in the least, miss opportunities for a strike where a simple slide to the left/right/rear would put them into position for attack. The reason for this is that not all bot chassis are designed to move efficiently left or right so in order to be usable by all chassis the Orient command must be usable by all bot types.
So with all these pitfalls involved with the usage of Orients, why would someone be so foolish as to use them? Several reason really. Because they are simple to use. Because being aware of their problems allows you to work around them. Because players who have developed more efficient movement systems are hesitant to release their creations to the public. And Finally, Because one single Orient command can save you literally dozens or hundreds of line of code.
As far as what commands you have available to set in Orient, there are 2 different conditions that you're Orients will operate under : When and enemy IS detected and When and enemy IS NOT detected.
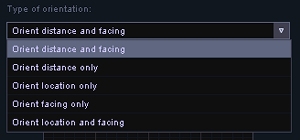 |
As you can see in the image to the right, we can command our bot to do various tasks when the enemy is detected. Each selection allows you to adjust various parameters found in the graphical Orient window (the window with the small grid with two circles representing you and the enemy) so that your bot will face the enemy, keep a set distance to the enemy, move to a specific location around the enemy, or a combination of all 3. |
The first selection, "Orient Distance and Facing" allows you to set how close you want to get to the enemy and at what angle you want your bot facing when its at that distance. You will see the round icons of both you and the enemy in the controller box. Your bot icon will have a small point on it to designate its front, and there will be a circle around the enemy that represents how far away from the enemy you wish to stay (See the first image for this page for an example). By left clicking on your bots icon you can increase and decrease your distance. If you increase your circle so that it goes larger than the area shown you can zoom that grid area out by holding the Shift key, holding your left mouse button, and moving your mouse left and right to zoom in and out. Using your Right mouse button on your bot's icon will allow you to change your facing angle to the enemy.
So "Distance and Facing" will command your bot to try and accomplish two goals; Get to the set distance and then once there turn your bot so that your angle.toEnemy matches what you've set your icon to. Although most people simply leave the angle setting so that it points directly at the enemy, there are times when you want a specific side of your bot toward the enemy - perhaps because you are better shielded on that side, or to bring a specific weapon into play, or simply because you wish to use this kind of an Orient to set you up for a further, complex, move.
"Orient Distance Only" is rather self explanatory. No need to set angles or what not. It appears in the Orient window much like our first image except that now our bots icon no longer has a little point on it to designate its angle. With "Distance Only" we don't care about our angle or the enemy bots angle, only that we maintain a specific distance from the enemy. Simply drag the circle bigger or smaller, depending on how far from the enemy you wish your bot to be.
"Location Only" is a bit different from the previous two selections. The Orient window will display the enemy bot and our bot's icons and have no circle for distance. The enemy bot now has the small point to designate its front, but our bot's icon is now fully round. We can drag our icon anywhere around the enemy bot and see a grid representation of numbers, like x: 4.5 and y: 2.l ... x represent left and right with positive numbers meaning to the left and negative numbers to the right. y represents forward and back, with positive numbers meaning backward and negative numbers meaning forward.
So x:4.5 tells our bot to place itself 4.5 meters to the left of the enemy, and the y:2.1 tells our bot to place itself 2.1 meters in front of the enemy. Explaining this is much more difficult than actually using the Orient Window to see how it works for yourself. Basically this Orient setting is telling our bot where we want it to be in relation to the front of the enemy bot. This is quite useful in avoiding direct attacks. Many bots utilize the direct approach, strengthening their defenses and offenses to the front of their bot, and using this type of orient might gain you an attack against an underprotected side.
The "Orient Facing Only" setting displays our icon with a small point to designate the front (or 0 degrees) and the enemy icon is perfectly round. There are no circles or lines to connect the two icons. By using the left mouse button we can rotate our icon's pointer to the desired angle we wish our bot to be pointing in relation to the location of the enemy. In other words, it simply tells our bot what angle to present to the enemy. If you wanted the left side of our bot to be facing the enemy you would turn it so that the pointer read 270 degrees. If you wanted our right side then it would read 90. 0 degrees would be our front pointing at the enemy, and, of course, 180 degrees would be our rear.
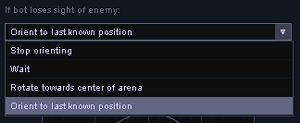
So what if we lose sight of our enemy? When you set your Orient commands you can also designate where your bot goes when it cannot detect the enemy. OR you could set up Orient Commands aimed specifically at finding the enemy when they are out of your sensor range. Here are the selections available to you :
| "Stop Orienting" means just that. Your bot stops orienting so that other move commands can come into play. If the enemy suddenly slips out of your detection range then any Orient commands in progress are immediately halted. I have to confess that I've not used this particular command before so cannot explain it any more than that. The next command "Wait" is also one that I have not had much familiarity with. I would infer that your bot simply waits to see if the enemy comes back into sensor range. Sorry that more information is not available for this. I will update this particular description if/when i receive more information on it. |
 |
"Rotate to Center of Arena" will make your bot turn toward the center of the arena. This could be used in conjunction with other moves to begin a search process to find the enemy.
"Orient to Last Known Position" will take your bot to the last place that you detected them. This has both good qualities and bad qualities. When a battle first begins your bot does know the starting position of the enemy bot and can use this to move toward them. Or after a deadlock is declared and both bots area placed back in their starting positions your bot will "remember" where the enemy bot was and then attempt to move there to find the enemy. The draw back of this is that until the enemy is detected again your bot will keep strolling over the spot where it last saw the enemy. Setting up a timer in your AI for such occasions would be a good idea so that your bot doesn't simply keep going to the same spot. After a predetermined amount of time you could begin a search pattern of some kind to find your enemy.
The very bottom of the Orient window has a slide bar labeled "Stop Trying after..". This tells your bot how long to keep attempting to fulfill the orient. If you set this too high then your bot may ignore other commands given to it until it completes the original Orient instructions, and if you set it too low then your bot may never have the opportunity to try and fulfill the Orient instructions before it gives up. Many designers will set this to "1" knowing that the Orient call will be made several times. The result is that your bot will move in very small steps as it tries to complete its Orient instructions. This can be advantageous if you wish to move cautiously.
If you look in your AI panel under "Blocks" you will find an AI Block called something like "Find Enemy". This is an AI that was included with the game and turns out to be a very simple, yet powerful set of AI instructions for moving your bot to the enemy. Basically this block makes two checks, calling an Orient in each case if the check turns up false.
The first check determines if you are lined up with the enemy (me.angleToEnemy is higher than 355 or less than 5). An angle of 0 degrees means that your bot is pointing directly at the enemy, but rather than check for this tight condition the orient checks to see if you are off by a few degrees and accepts that as close enough. If you are pointing too far away from the enemy then the Orient kicks in to turn your bot to exactly 0 degrees : exactly facing your enemy.
The next check is for the distance between you and the enemy and if your are not within the set distance it moves you forward until you reach that. The beauty is that it makes the directional check first. If you are not pointed at the enemy then it will begin to turn toward them. If you are not the correct distance it will TRY to move toward them, but if you are in the process of turning it will ignore the movement command!
This set of simple instructions could be further trimmed to use "Orient : Distance and Facing". By using a complex query node (the ? node) you would put [me.angleToEnemy < 355 and me.angleToEnemy >5) AND me.distanceToEnemy < 5] as your query. In the "Y" line you would place an orient with "Distance and Facing" and set it so that your facing was directly at the enemy and your distance was 5. In effect, if your bot was not lined up with the enemy and 5 meters away it would use the orient to place you there.
Both cases would work, but I would suggest setting the Time for the event (on that slider bar) to be no more than 2. This way if the enemy bot is moving at you as well your bot wont "overshoot" the distance trying to get to where it "thinks" the enemy is. It will take short moves toward the enemy and limit overshooting or even running into the enemy.
Just keep in mind what your Orients are trying to do and remember some of the pitfalls involved with them. Orients don't try and evade walls so it might be a good idea to check how close you are before using an Orient.
If you still have questions then please email me and i'll try and help if I can.