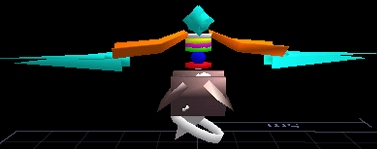
As a recap and update, lets go over the colors of the components to help you identify them during this Lesson. The WHITE sections are the chassis and critical components (hidden mostly inside the chassis) and the single "stretch" component located on top of the stacked joints. The stacked joints are in GREEN, PURPLE, and YELLOW colors. The chassis is protected by plates of weapons shown in GRAY, the Shield arms are in ORANGE, and the 4 main Raiken Swords are in LIGHT BLUE. Our angle setting join is in DARK BLUE and, finally, our Direction joint is in RED
Because of the various joints we have used in creating the Spinner assembly we will have several Moves to create in order to utilize them. The first thing I did was go into the design panel, select the joint movement icon, and offset each of the 3 stacked Standard Medium Omni joints by the smallest amount of movement that I could. This will allow me to create a "Reset" move in which all 3 joints return to their center position when the Spinner is not in use.
I am assuming that you understand the concepts of creating moves within the Movement panel and will not go further into HOW to make moves. If you are in need of assistance for how to create moves then please email me.
Here are the Moves that I created for use with this bot. All moves use only 1 Snapshot :
Spin Right - Rotate all stacked joints (The Green, Purple, and Yellow ones) to the Right
Spin Left - Rotate all stacked joints (The Green, Purple, and Yellow ones) to the Left
Reset Spinner - Remember I mentioned offsetting the stacked joints? Now I create a move putting them back to the center
Low Angle - Rotate the angle joint (Dark Blue) so that my Spinner assembly tilts down in the front.
High Angle - Rotate the angle joint (Dark Blue) so that my Spinner assembly tilts up in the front
Flat Angle - Rotate the angle joint (Dark Blue) so that it tilts down the smallest amount that I can. I need this to be my angle Reset and if I simply take a snapshot with it in the "flat" position it will not record it as a move. I just want to move it enough so that when I take the snapshot it registers as a move and is as close to flat as possible.
Front - Rotate the direction joint (Red) so that my assembly is pointed ahead. Just like the "Flat Angle" move, I neglected to offset this joint so now need to move it just enough off center to register when I take a snapshot.
Right - Rotate the Directional joint (Red) 90 degrees to the Right
Left - Rotate the Directional joint (Red) 90 degrees to the Left
Back - Rotate the Directional joint (Red) 180 degrees to face the rear of the bot.
This bot will use no zones. Although zones are a powerful tool, they can sometimes cause more work than they are worth. We will instead depend on data such as distance and angle to enemy, the enemy height, and the enemy's maximum reach. Shown below is the general blocks of AI used for this bot.
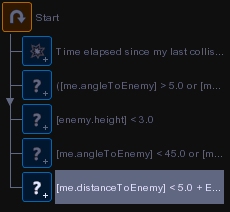
Each block is designed to be as efficient as possible. This entire Lesson bot runs on a Rechtect Symbiote Processor with only 75 decisions per second. It will process its entire AI within 1 to 3 time slices.
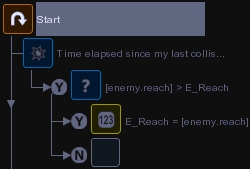 |
The very first bit of code we have here checks to determine if our bot has been in a collision within the last second. If a collision has occurred it then checks the stored value of the text variable "E_Reach" against that of enemy.reach. If enemy.reach is larger than our stored number then we update E_Reach to equal enemy.reach so that we can always remember the furthest distance that the enemy can reach. Knowing the enemy's maximum reach can be vitally important in positioning your bot for attack. One thing to consider however is that if you destroy a long arm of the enemies your bot will still move as if that arm is there if you depend on a reach variable. One possible solution to this would be to reset the reach value to 0 periodically and take a "fresh reading". |
| In our second block of code we have our maneuvering AI. We want this near the top so that our bot reacts to a fresh world variable update as soon as possible (See "How it works and How you Trim it" for further explanation on how the AI operates). This is probably the simplest movement coding you can have. Our bot simply checks to see if the enemy is in front of us and within strike range. If it is not then an Orient command is called which places our bot 3 meters to the left and facing our enemy. We use the Orient setting "Location and Facing" for this. | 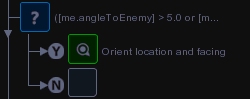 |
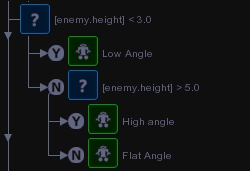 |
Our 3rd AI block uses the enemy's height to set the angle of our Spinner assembly. First it asks if the enemy's height is lower than 3, if so it performs the move "Low Angle". If the enemy's height is NOT less than 3 it asks if it is taller than 5 meters. If so our bot runs the "High Angle" move. If the bot is NOT taller than 5 meters then the bot simply performs the "Flat Angle" move. In this manner our bot changes its angle if the enemy raises an arm to it. Dependant upon the range of your Spinner, we could create several different Angle levels and have our bot change its angle more specifically. |
| Next we work with our Directional joint (the Red one). This section of AI simply turns our directional joint so that it faces the enemy at all times. This way when we change our tilt angle (the Small Standard 45 degree joint in Blue) we are adjusting our attack directly against the enemy. If we left our Spinner locked forward then we would be at a severe disadvantage when the enemy was at our sides or rear. I created 4 moves : Front, Left, Right, and Rear each corresponding to enemy.angle. If the enemy's angle is greater than 315 or less than 45 then i know its in front so point that way. Between 225 and 315 I activate the Left move, Between 45 and 135 degrees I activate the Right move. If the enemy's angle doesn't correspond to any of these checks then i KNOW its behind me and perform the Rear move. These are very simple moves to cover the location of the enemy. Don't feel your are limited to only 4 moves here, an intrepid designer could actually create a move in far smaller increments around their bot. I merely restricted myself to 4 for simplicity's sake. | 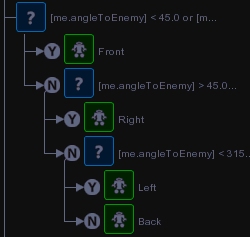 |
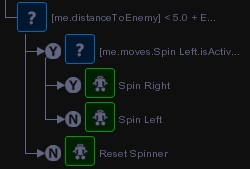 |
Finally is our attack Code. We want our Spinner to spin and upon hitting the enemy immediately reverse direction and hit them from the other side. Attacks like this can rack up the damage fast and keep an opponent trapped between our Spinner arms. There are two ways to set our attack move up. The first requires only a single move with 2 snapshots. The first snapshot has our stacked joints (Green, Purple, and Yellow joints) all turning as far Right as they can. The second snapshot turns all the stacked joints to the Left. Using this method of snapshots our Spinner will automatically switch directions should its spin path be disrupted (by a hit). However this method suffers a small delay when switching from the second snapshot back to the first. |
Our AI is missing a few crucial bits of code, such as checking for the walls, avoiding the enemy if our weapons are destroyed and we are winning, searching out enemies that we've lost track of, or even intercepting enemies that try and run. Look for further lessons on these kinds of AI coding in the future.
For now, our bot is complete and ready to fight. Each section of AI is trimmed to run efficiently and our bot can easily operate on the smallest of controllers. We have ample energy needs to support our moves the entire fight, and both offensive and defensive weapons and armor are in place. Our AI attempts to keep away from the enemy's direct front, defeating most bots right there, while keeping close enough for our own weapons to hit while we move around. I have also provided the Lesson bot that I created for download. CLICK HERE TO DOWNLOAD IT. Feel free to examine all aspects of this bot. Change, experiment, and try out new things. That's the BEST way to learn!
As always, Email me if you have any questions and I'll try my best to help you out.